


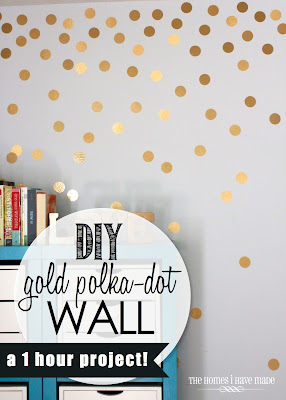
I have this great plan of incorporating polka-dots and chevron {my greatest weaknesses} into our new office and I couldnt be more thrilled or excited. I will be posting the DIY Chevron Canvas Art shortly, but my original plan was to do a dark Navy Blue accent wall with gold metallic polka-dots on the wall like this:
{Source}
However, my hubby was a little skeptical. Truthfully, I dont blame him. What if it got really messed up and wasnt what I was picturing in my head?? I began searching for chevron projects and while I was in my search I found this:

{Source}
Easy peasy? Yep! This was the solution to our problem and I would still get something polka-dot!! I set out for Michael's and was on my way to a new project.
What You'll Need:

1. Decide the size of your canvas'
{I chose 8X10 and they were on sale for 4.99 for a 2-pack at Michael's!}
2. Pick the color scrapbook paper you are wanting.
{I chose gold glitter and gold metallic, along with coral glitter and an everything color glitter page} Michael's just so happened to have a sale on paper so they were $1 a piece. How awesome is that for a cheap project??
3. If you are going to paint your canvas, pick your color paint. I chose just a cheap .83 paint that was called "Melon" to go along with the coral color.
4. If you dont have a circle punch then you can buy one. I found the smallest one for $3.99 at Michael's+40% coupon makes for a super cheap circle punch.
5. Strong adhesive or hot glue gun. I used a hot glue gun because, duh hot glue is so much better!
Now for the fun part:
1. Start punching little circles. You will be happy you got this done first. Whilst its easy, its a little time consuming
2. When you are done with all your circles, get your canvas out and now start to arrange the circles how you would like them, UNLESS you are wanting to paint, go a head and paint your canvas first.

My hubby liked the "not so clean" paint look so I left it unfinished and grungy like.

3. When you have your circles punched, arranged and just how you like, start gluing or laying them down. I just flipped mine over one by one and put a little hot glue on the back of them and then laid them back in place. Feel free to glue and pick your place as you go, but I just thought I would see what it would look like first, in case I wanted to rearrange or try different things out.

4. This is what the final product looks like when you are finished. You can do as little or as many canvas' as you would like. I chose four but may end up doing more once I can get in the office and start putting it all together.

Easy right??
Took me maybe an hour or two to do it all!
Good luck!
Would love to see your final product if you decide to give this a whirl :)
Cute!!! I'm obsessed with coral and gold right now!
ReplyDeleteMeee too! Great colors together!! I dont know why I never thought of those two together a lot sooner ha!
DeleteSuper cute!!
ReplyDeleteThank you :)
DeleteThese turned out great!
ReplyDeleteThank you :)
Delete